Depth of Field Photography Basics
Depth of Field Photography Basics
Understanding aperture & depth of field requires a strong foundation in the basics of a camera lens, along with the vocabulary used to describe them, such as f-stop, focal length, focus range, and field of view.
This section provides an overview of the basics.
The following sections provide technical details allowing you to apply these concepts to your own photography.
What is Aperture in Photography?
The terms f-stop and aperture are often used interchangeably, this is incorrect.
- Aperture refers to aperture diameter, where light enters the front of the lens.
- F-stop is the ratio of lens focal length to aperture diameter.
- F-stop can be referred to as f-number or f-stop value. They are the same.
F-stop is a dimensionless number, denoted by a hooked “ f ”, with an underlying number denoting the f-stop value.
The hooked “f” is shorthand for f-stop, like the ”s.” after a shutter speed is short for seconds.
f/2.8 and f/8 are two examples of common f-stop settings, where 2.8 & 8 are the f-stop values, respectively.
F-Stop = Lens Focal Length (mm) / Aperture Diameter (mm)
The aperture diameter is the straight line distance from one side of the aperture to the other side of the aperture, crossing directly through the aperture’s center.
The lens focal length determines the composition, magnification, & field of view, as described in the section below.
The graphic shows increasing f-stop values with decreasing aperture diameters.
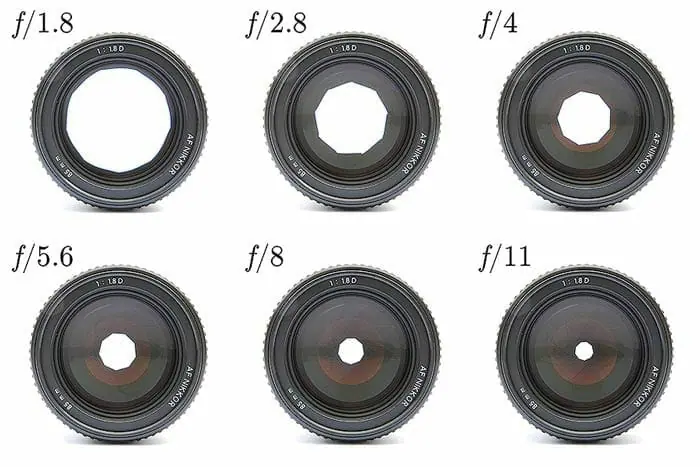
Attribution – Wikipedia
For example, using the equation above, if the lens focal length is 50mm and the aperture diameter is 25mm, then f-stop = 50mm/25mm = 2, denoted as f/2.
For a lens focal length of 400mm and an aperture diameter of 50mm the corresponding f-stop = 8, denoted as f/8.
Photographers determine the f-stop and focal length with camera settings, controlling the corresponding aperture diameter where light enters the lens.
- The larger the f-stop value, the less light enters the lens, over a set exposure time.
- The smaller the f-stop value, the more light enters the lens, over a set exposure time.
What is Depth of Field in Photography?
Depth of Focus vs Depth of Field (DOF) – To clear up any confusion, these terms mean the same thing. They can be used interchangeably with focus range and DOF.
- Depth of field or focus range is the distance between the closest and farthest objects in an image, both of which are in focus.
- All objects between these closest and farthest objects are also in focus
- The photographer can adjust the f-stop value, in turn, controlling the depth of field.
Smaller f-stop value = larger aperture diameter = smaller DOF
Larger f-stop value = smaller aperture diameter = larger DOF
The following examples show small or shallow depth of field vs large or deep depth of field, in photography.
Use these examples to visualize the concept. Detailed explanations are provided below.
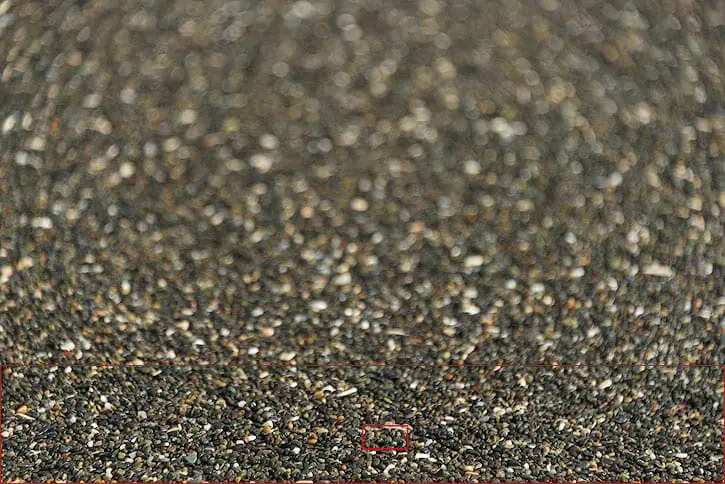
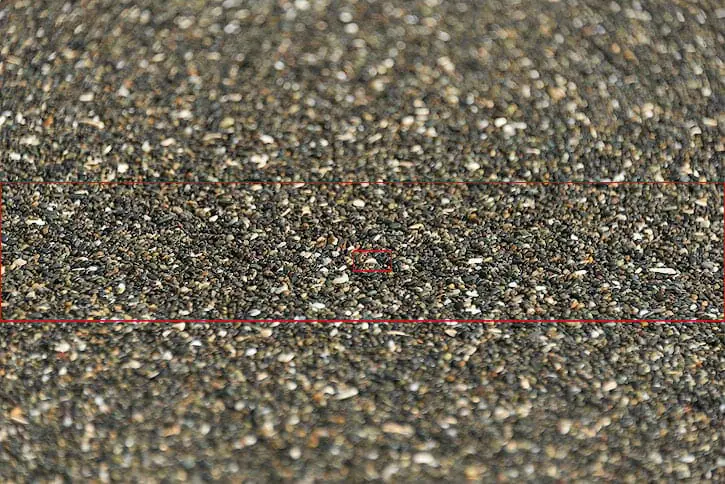
The first image was photographed at f/5.6 & the second image at f/16.
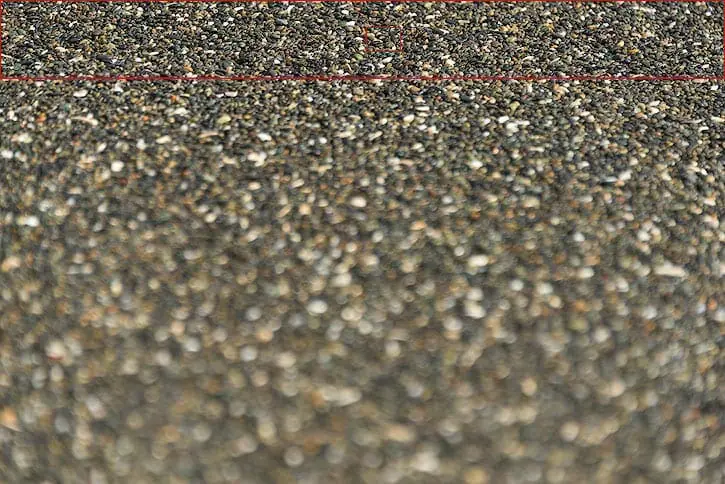
The example photos, rocks on a beach, show depth of field in a drastic manner, making it easy to discern.
 Photographed at f/5.6

Photographed at f/16
The red lines denote the closest (bottom) and furthest (top) objects which are in focus. All objects between these closest and furthest points are also in focus.
The red box denotes the focal point within the image. This is the location which I focused on to take the shots. The focal point always lies within the focal range, or depth of field.
In the images above, the focal point, denoted by the red box, stays at approximately the same location. The depth of
The depth of field or focus range extends beyond the focal point, as the f-stop increases from f/5.6 to f/16.
Here is another example of two landscape photos showing varying depths of field.
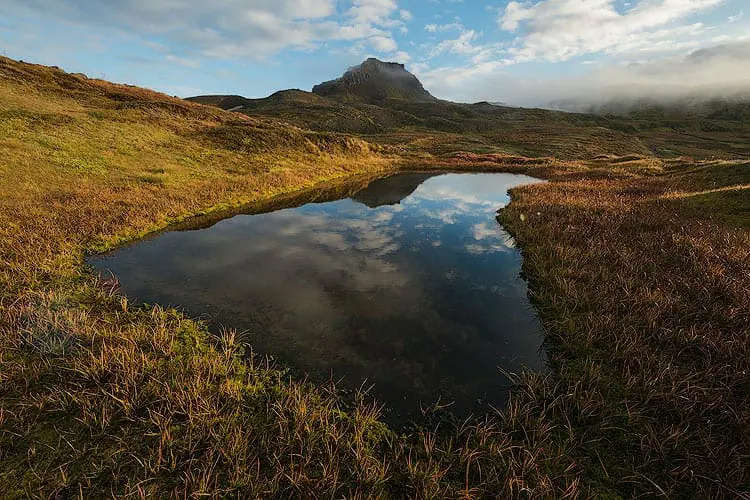
The first example below shows a deep also known as large depth of field. Everything in the entire image, foreground to background is in focus.
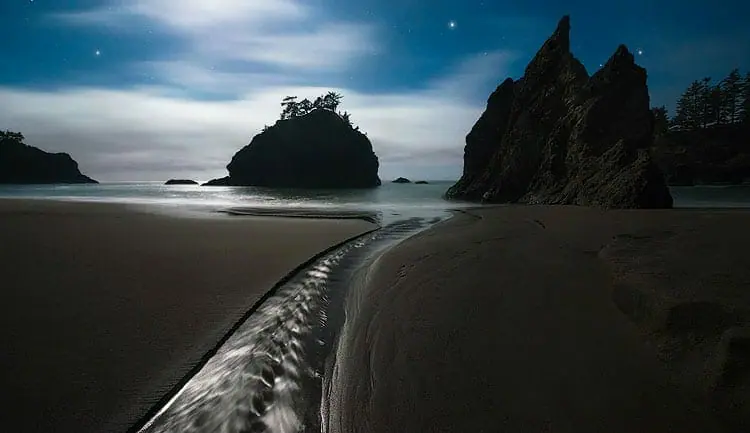
The Oregon Coast Under Moonlight – Large Depth of Field @ f/8
The second image shows a shallow depth of field example.
Only the subject is in focus, while the foreground and background are not in focus. The focus range is very shallow providing a small depth of field.
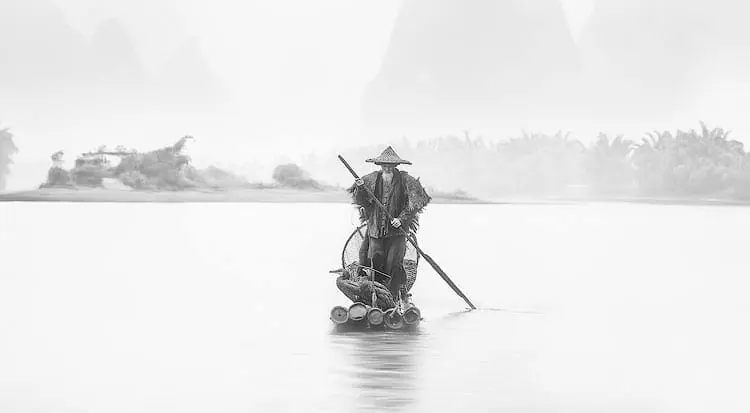
Cormorant Fisherman in China – Shallow Depth of Field @ f/4
What is Focal Length in Photography?
The lens focal length, provided in millimeters, is a setting selected by the photographer, which determines the field of view.
The Field of View, F.O.V for short, includes everything seen through the viewfinder for a given focal length.
- Larger focal lengths, producing smaller fields of view, zoom in or magnify the subject, isolating it in the composition, such as a close-up of an animal in nature.
- Smaller focal lengths, producing larger fields of view, zoom out, showing more of a scene. For example, a broad & distant landscape.
- Focal length also has an effect on depth of field, as taught below.
The photographer can adjust the focal length to select the desired field of view. Doing so determines outside boundaries of the image composition.
The focal length range provides the maximum and minimum focal lengths the photographer can select for a given lens.
The following photos are unedited RAW files straight out of the camera, without editing. This allows the viewer to see the actual picture qualities discussed, without possible changes due to editing.
Example Images – Focal Length & Field of View
The following 3 RAW picture files show, top to bottom, 14mm, 24mm and 80mm focal lengths, all photographed from the same location.
As the focal length increases the field of view decreases and the subjects in the image become magnified.
14mm Focal Length
24mm Focal Length
80mm Focal Length
Wide Angle, Standard, & Telephoto Lenses
Human vision is approximately 50mm focal length. Compared to standard vision, focal lengths larger than 50mm will magnify a scene, producing a smaller field of view.
Focal lengths smaller than 50mm will produce a “wide angle view”. This creates a field of view wider than normal human vision.
Objects in this field of view tend to become smaller and slightly distorted, compared to what we are used to seeing.
- Wide Angle Lenses produce a field of view larger than our standard vision & usually range from 8mm to 35mm in focal length.
- Standard Lenses produce a field of view similar to our standard vision & usually range from 40mm to 60mm in focal length.
- Telephoto Lenses produce a field of view smaller than our standard vision & usually exceed 70mm in focal length.
How to Read a Camera Lens
Prior to selecting the correct f-stop & focal length settings, producing the desired depth of field, the basics of a camera lens must be understood.
Reading a Camera Lens: Focal Length
The concepts taught below can be used to read any camera lens. The lens brand is arbitrary.
A Nikkor 28-300mm, shown in the graphic below, has a focal length range of 28mm to 300mm. This is known as a Wide Angle Zoom Lens since it covers the entire field of view from wide angle to zoom.
This focal length range is noted on the side of each lens.
The focal length range for this specific lens is labeled in gold letters as 28-300mm, seen just above the “AF-S NIKKOR” label.
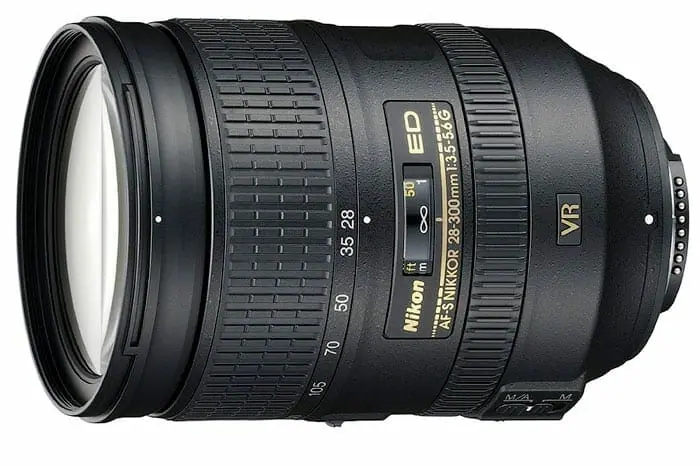
The photographer can select any focal length in the range of 28mm all the way to 300 mm, in turn changing the field of view.
The photographer’s currently selected focal length, which must fall within the focal length range, is provided on the adjustable barrel of the lens.
For this specific lens, the currently selected focal length, as noted on the adjustable barrel ( marked with a white dot ), is 28mm.
This means the photographer is currently shooting at a 28mm focal length.
The Nikkor 14-24mm is known as a wide angle lens. The field of view is greater than the human eye can view.
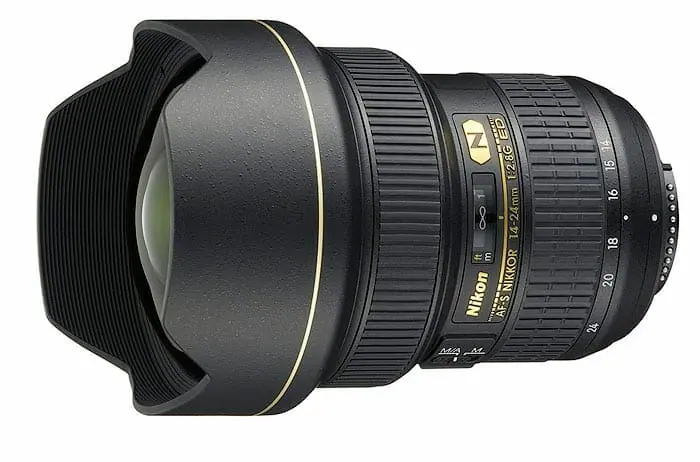 The wide angle lenses have smaller focal lengths such as 14mm. Telephoto lenses have larger focal lengths such as 300mm.
- The smaller the focal length the larger the field of view.
- The larger the focal length the smaller the field of view.
Effective Focal Length
Shooting with cameras that have crop factors above or below 1 will change the field of view seen through the lens, effectively changing the focal length.
Using the camera crop factor an effective focal length can be calculated.
A 28-300mm lens used on a 1.6 crop factor camera would have an effective focal length range of 45mm – 480mm, calculated as follows: ( 28mm X 1.6 ) – (300mm X 1.6 ).
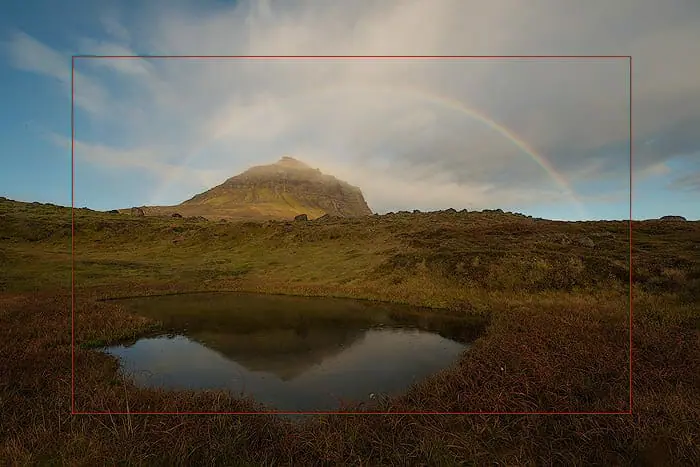
The following RAW file, taken in Iceland, was shot at 14mm on a full frame camera with a crop factor of 1.
The same image, taken at 14mm on a 1.6 crop factor camera, would produce an image that appears as though it was taken at 22mm ( 14mm X 1.6 ).
The Red Box denotes what the composition would look like on a 1.6 crop factor camera.
Some pro model cameras have the ability to change their effective sensor sizes, in turn changing their crop factors, & effective focal lengths
For example, a full frame camera shooting with the 28-300mm lens could change crop factors to maximize the zoom to 480mm ( 300mm X 1.6 ).
This may work well for scenes requiring a long telephoto lens, where the photographer didn’t want to carry around a heavy 500mm.
Although some of the positive image attributes are lost when increasing crop factors, this loss could be worth it, given the situation.
Reading a Camera Lens: F-Stop Value
Each camera lens has a minimum f-stop value, or widest aperture diameter, in which it can operate for any given focal length.
Most lenses are designed so the minimum f-stop value increases as the focal length increases.
The lenses label shows the focal length range to be 18-35mm. The photographer can shoot at any focal length, in the range of 18-35mm, producing their desired field of view.
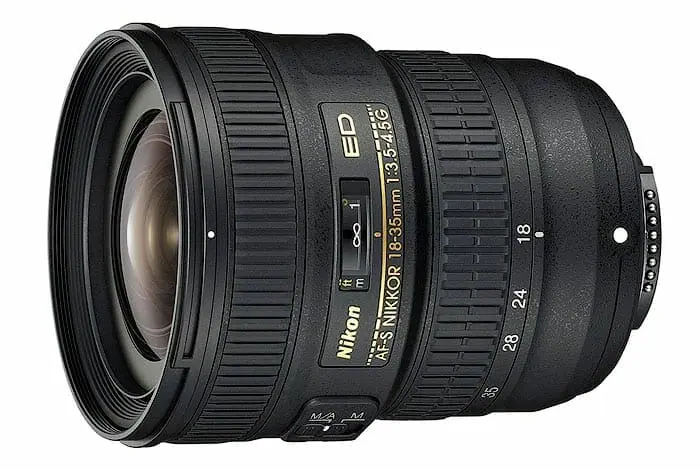
Following the focal length range is the minimum f-stop range of f/3.5 to f/4.5, noted on this lens and most others as 1:3.5-4.5. The letter “G” following the minimum f-stop range does not apply to the f-stop values.
The range of f/3.5 to f/4.5 provides the minimum f-stop values (widest aperture diameters), that this specific lens can maintain while shooting at the minimum and maximum focal lengths, respectively.
For example, the minimum f-stop value this lens can maintain is f/3.5 while shooting at 18mm.
As the focal length increases, from 18mm to 35mm, the minimum f-stop also increases, until it reaches f/4.5 at 35mm.
All focal lengths between 18mm and 35mm will have minimum f-stop values ranging from f/3.5 to f/4.5.
You can always increase the f-stop to larger values. The noted values are only the minimums.
Lens Speed, Explained
The minimum f-stop value(s) noted on the lens is/are often referred to as lens speed.
Lens speed is the maximum aperture diameter, or smallest f-stop value, a lens can operate at, for a given focal length.
As the focal length increases, from 18mm to 35mm, on the lens above, the aperture diameter becomes smaller, reducing the f-stop from f/3.5 to f/4.5.
In turn, a longer exposure time (controlled by shutter speed) is required to collect the same amount of light information.
The “faster” the lens, the lower the f-stop value it can maintain over its entire focal length range. This provides shorter possible exposure times at any given focal length.
Looking at the Nikkor 14-24mm f/2.8 Wide Angle lens above, there is a single minimum f-stop value given of 1:2.8.
This specific lens can maintain an f-stop of f/2.8 while shooting at any focal length in the range of 14mm to 24mm.
As the photographer adjusts the focal length this lens has the ability to maintain a constant minimum f-stop value of f/2.8, if so desired.
Lenses that can maintain a constant minimum f-stop value are usually much more expensive.
There is also a maximum f-stop value or minimum aperture diameter that each lens can maintain while shooting at each focal length.
These values are not listed on the lens since they do change the maximum / fastest limits of “lens speed” and the corresponding minimum exposure times.
Exposure Stops & F-Stops
An exposure stop, stop for short, provides a universal scale to measure the increase and decrease in light, exposed to the image sensor, due to changes in shutter speed & f-stop.
For ISO, exposure stops provide the increase or decrease in signal (light information) amplification, thus how much light is required to produce the optimal exposure.
Overall, stops provide an easy way for the photographer to increase or decrease image brightness or adjust specific f-stop, ISO, and shutter speed settings while balancing the exposure triangle.
To make things clear the following examples discuss stops for f-stop, while assuming shutter speed & ISO settings stay constant.
Upon understanding the concept, read the Photography Exposure Triangle Guide and learn to adjust all settings simultaneously, using stops.
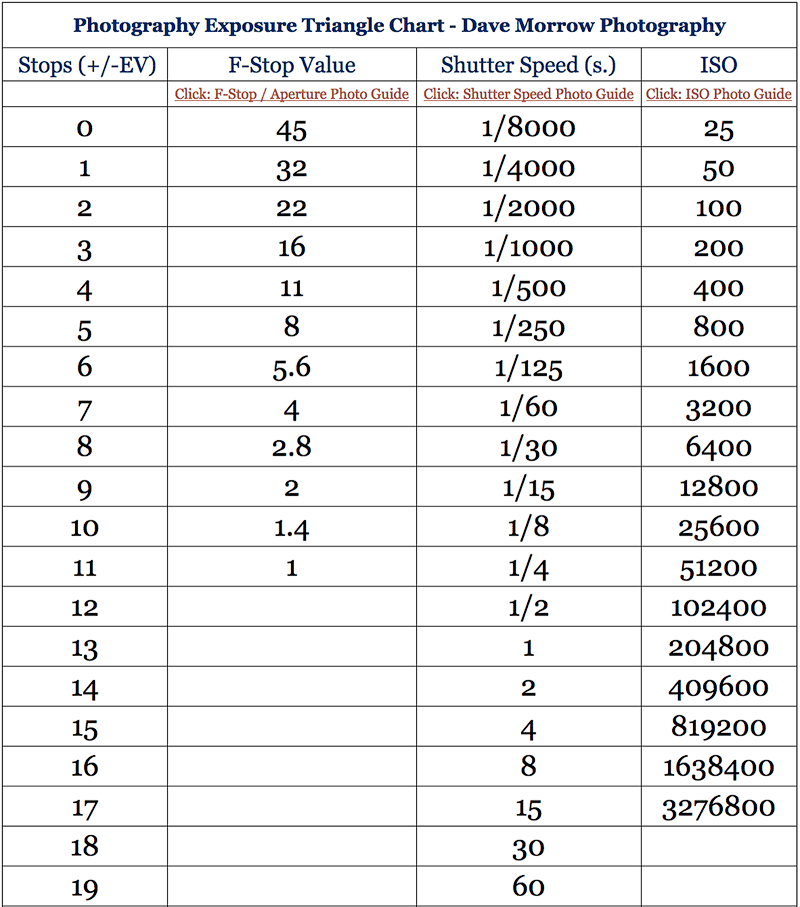
The Stops Column shows the difference in stops between different f-stop values.
The F-Stop Value Column shows different standard f-stops in 1 stop intervals.
Specific stops don’t directly correlate to specific f-stop values.
Stops allow you to easily compare the amount of light captured by one f-stop setting compared to another.
This makes it easy to increase or decrease the image brightness & balance the exposure triangle without guessing.
Increasing the f-stop, thus producing a smaller aperture diameter, forces the image sensor to collect less light information, producing a darker image, with increased depth of field. This is known as stopping down.
Decreasing the f-stop, thus producing a larger aperture diameter, allows the image sensor to collect more light information, producing a brighter image, with decreased depth of field. This is known as stopping up.
For F-Stop, Exposure Stops Work as Follows:
- An increase of 1 stop doubles the amount of light exposed to the image sensor, creating a brighter exposure and reducing the depth of field.
- A decrease of 1 stop decreases the amount of light by half, creating a darker exposure, increasing the depth of field.
In the following examples, ISO and shutter speed are constant. Only f-stop changes in 1 stop increments.
The first example was taken at f/11, followed by f/8, f/5.6, and f/4. The focal point stays in the same location.
The focal point stays in the same location.
As the f-stop decreases, in 1 stop increments, the image becomes brighter and the depth of field decreases.
An easy place to see the decrease in depth of field is the railing at the bottom left-hand side of the image.
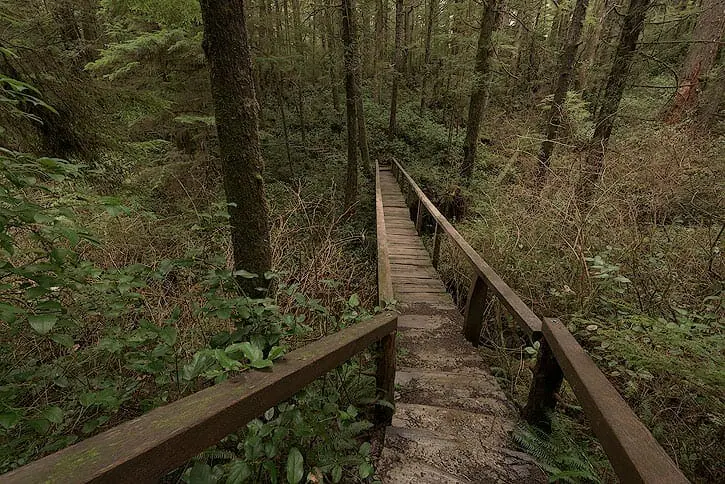
Settings: f/11, ISO100, 1/5th second
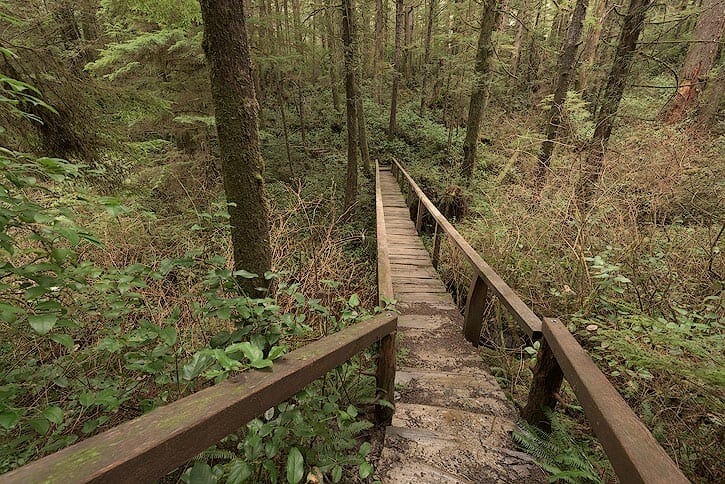
Settings: f/8, ISO100, 1/5th second
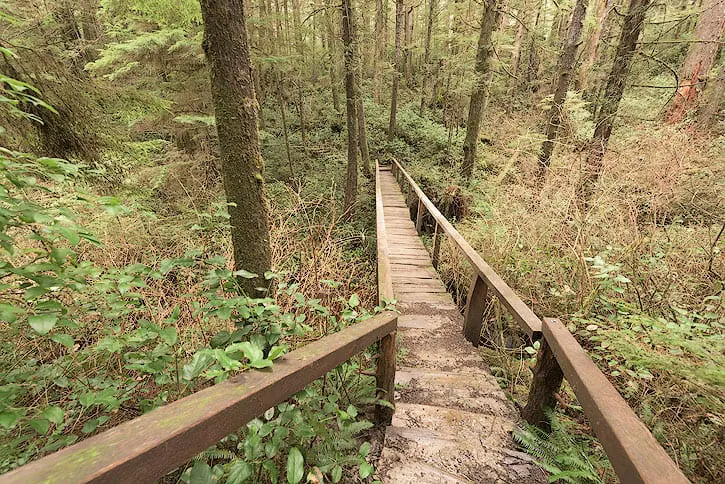
Settings: f/5.6, ISO100, 1/5th second
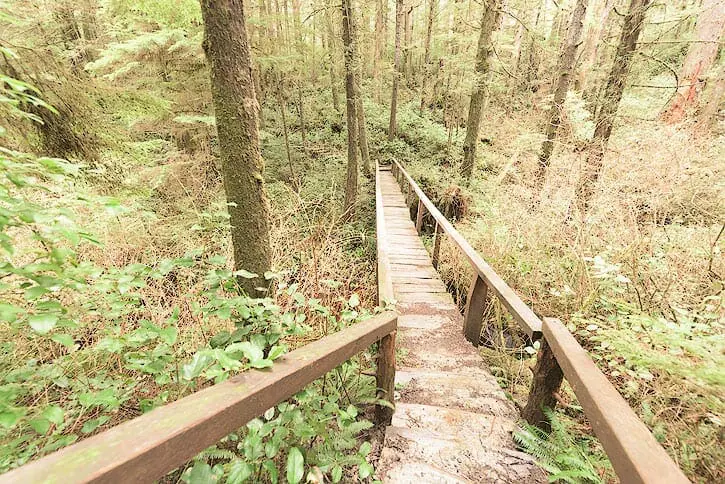
Settings: f/4, ISO100, 1/5th second
To maintain constant image brightness, while increasing or decreasing f-stop, changes in ISO or shutter speed must be made by the same number of stops, in the opposite direction.
For example, a stop up in f-stop would require a stop down in ISO, shutter speed, or a combination of both, to maintain the same image brightness.
This is taught in the Exposure Triangle Photography Guide.
Aperture Diameter & Exposure Stops
F-stop and focal length determine aperture diameter, thus for a set focal length, shutter speed, and ISO value, the amount of light exposed to the image sensor is only controlled by f-stop.
The total amount of light exposed to the image sensor, in terms of f-stop, is determined by the total square area of the aperture opening, found on the far right in the graphic below.
Aperture Area = Pi*(Aperture Radius^2)

For example, Shooting at an f-stop of f/1.4 provides a 314 square millimeter opening for light to enter the lens as seen in the Aperture Area Column.
Changing the f-stop to f/2, a single stop difference from f/1.4, cuts the aperture area in half, to 154 square millimeters.
This reduces the amount of light which can enter by half, equaling a 1 stop decrease.
F/2 allows 77 times more light to hit the image sensor than f/16. This is a 6 stop increase.
Looking at the Aperture Area Column in the graphic above, 154/2 yields 77.
By rating varying f-stop values on the scale of stops, these calculations are not required.
Shooting Example – Aperture & Exposure Stops
Let’s say you took an image with an f-stop of f/11 and noticed it was much too dark.
Remember, all other settings are currently arbitrary and remain constant.
Mentally you said, “If this picture captured 2 times as much light it would be perfect”. Reference images below
- You knew that a 1 stop increase (stopping up) in f-stop would 2X the light captured, creating the photo you wanted.
- Instead of guessing at the f-stop to use, you referenced the chart & saw that a 1 stop increase from f/11 was f/8.
- You selected this new f-stop setting and pressed the shutter button.
- Due to your knowledge of stops & f-stops the new image exhibited 2X the light of the previous image.
- There was no need to guess at the ideal setting or take test images! You’re done.
Slide right to view step 1 and left to view step 3.
| Changing Exposure with F-Stop |
Depth of Field Example Photos & Discussion
Depth of field (DOF) or focus range is the distance between the closest and farthest objects in an image both of which are in focus. All objects between these closest and farthest objects are also in focus.
Depth of Field is controlled by three factors, each shown with example photos below.
Click & Jump to each or scroll down to view them all:
Focal Point & Depth of Field
The focal point determines the focal range location within the image.
I prefer to use manual or single point focus for landscape photography.
Each of the following images was photographed at f/5.6. Only the focal point moves.
As the focal point moves, the focal range also moves within the image.
Each image outlines the depth of field, or focal range, with red lines. The focal point is denoted with a small red box.
The first image shows a focal point which was selected very close to the bottom of the image. The depth of field extends in front of and beyond the focal point.
The following image, all settings remain the same. The focal point was shifted into the middle of the image, moving the focal range.
The last image shows a new focal point moved even further back in the image.
The photographer’s goal is to select the correct combination of focal point location and f-stop settings to produce an image with their desired outcome, as taught below.
F-Stop & Depth of Field
The following examples show different image attributes which correlate to varying f-stop values and depth of field.
An image attribute is a specific visual effect obtained from varying camera settings such as f-stop, ISO & shutter speed.
In this case, we will look at visual image attributes determined by f-stop, providing varying depths of field.
- As the f-stop value increases, the aperture diameter decreases, allowing less light into the camera while increasing the depth of field.
- As the f-stop value decreases, the aperture diameter increases, allowing more light into the camera while decreasing the depth of field.
Small F-Stop Values & Image Attributes
Taken at f/1.4, the following image has a very shallow depth of field. This is great for isolating a single subject in the composition.
Shooting at f/1.4 produces a very large aperture diameter allowing more light to pass through the lens.
Using this f-stop value during the day requires a very fast shutter speed to compensate for the extreme amount of light which passes through the aperture diameter.
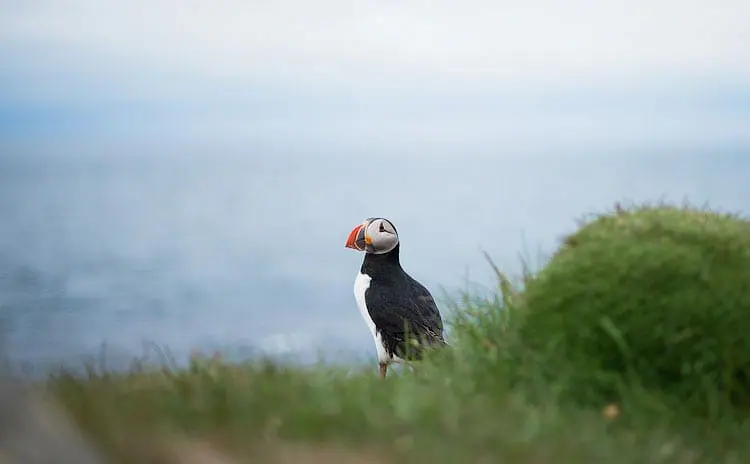
Icelandic Puffin – f/1.4
Shooting at slightly larger f-stop values such as f/2.8 provides the same effect with a slightly larger depth of field, as shown in the following example.
Notice that the fisherman & the boat are in focus but the close foreground and distant background are out of focus. Shooting at f/2.8 is also great Star, Milky Way & Night Sky Photography.
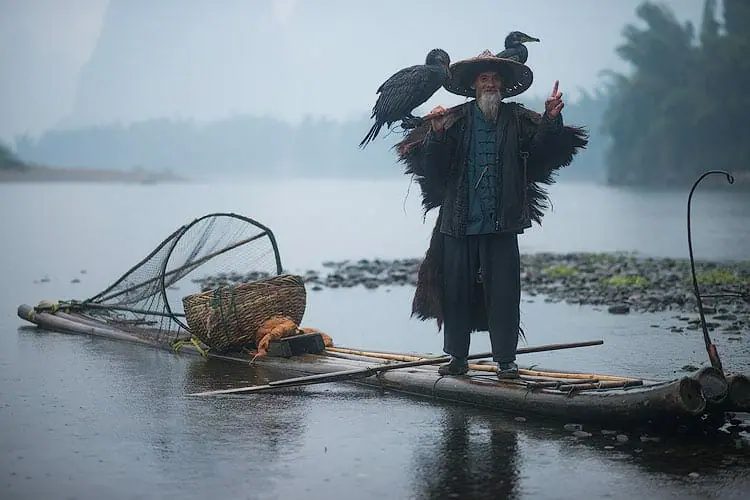
Fisherman on the Li River, China – f/2.8
F-Stop values of f/4 through f/5.6 provide a larger depth of field with the added bonus of an out of focus background or foreground, dependent on focal point location & focal length.
In the image below, f/5.6 was used, allowing the foreground to stay sharp with the mid-ground buildings in partial focus and the distance background becoming soft & out of focus.
The background buildings contained interesting details, thus f/5.6 was used in lieu of f/2.8, keeping the buildings partially focused & adding “interestingness” to the overall image.

Exploring Rural China – f/5.6
Mid-Range F-Stop Values & Image Attributes
F-Stop values of f/8 – f/11 are used for 90% of my images.
They provide a large depth of field which is ideal for landscape photography.
The image below is sharp in the immediate foreground and the distant background when taken at f/11.
Sunrise in the Icelandic Highlands – f/11
Large F-Stop Values & Image Attributes
At times, f-stop values larger than f/11 are necessary when longer exposures or extremely vast depths of field are required.
To lengthen the shutter speed and produce the “silky water” effect an f-stop value of f/16 was used.
F/16 reduced the light entering the lens requiring a longer shutter speed to maintain the overall exposure or image brightness.
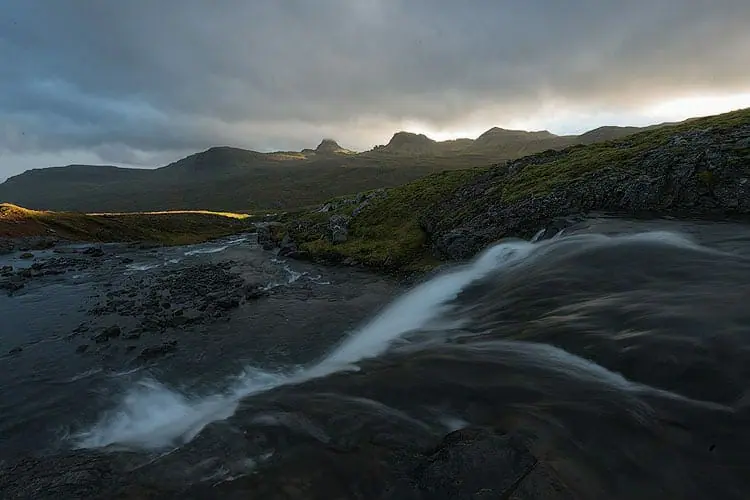
Waterfall at Sunset – f/16
Shooting at f/22 degrades image quality due to lens diffraction but provides a sun star due to the optics of the lens.
F/22 is only recommended for the sun star effect or to change the overall exposure, such as an increase in shutter speed as taught in the Exposure Triangle Photography Guide.
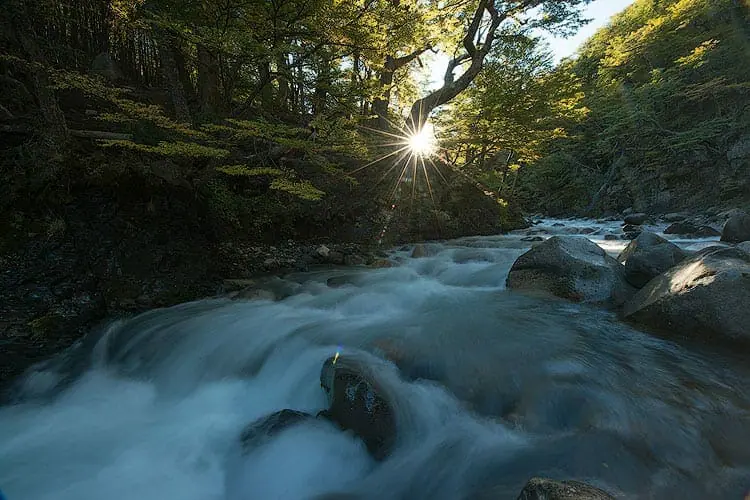
Glacier Rivers of Patagonia – f/22
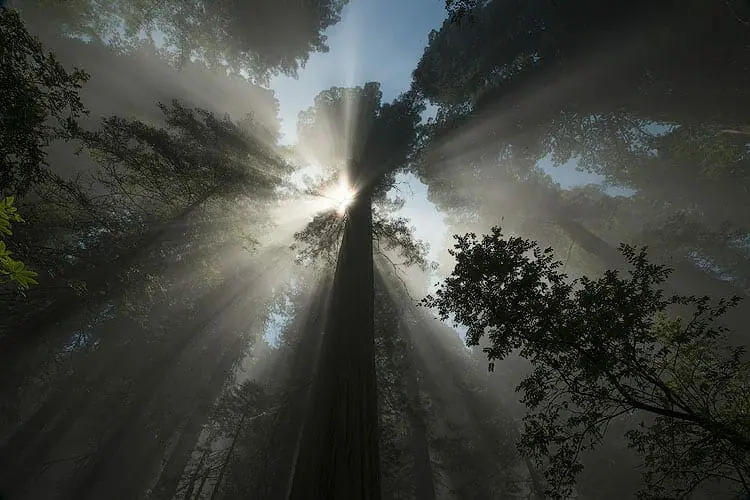
Morning Fog in the Redwoods – f/22
Focal Length & Depth of Field
Experimentation is key to finding the relationship for depth of field and focal length for a specific camera & lens setup.
The following statements are approximations or rules of thumb. Test & experiment to see what works!
- As focal length increases, subjects in the scene become more magnified, thus depth of field decreases.
- As focal length decreases, subjects in the scene become less magnified, thus depth of field increases.
Wide angle & standard lenses in the range of 10-100mm see negligible changes in depth of field due to focal length.
Exceeding 100mm focal length provides slight decreases in depth of field due to increases in focal length & magnification.
Telephoto lenses in the range of 150mm+ start to see extreme decreases in depth of field due to focal length.
To compensate for these decreases in DOF the photographer can increase f-stop values or use methods such as focus stacking.
Example Photos: Depth of Field Vs. Focal Length
When shooting at effective focal lengths of roughly 100mm or more increased f-stop values may be required to provide sharp focus throughout the entire depth of field.
This depends on the distance from the closest to furthest objects in the scene being photographed and the specific camera & lens being used.
As stated in the previous section, test & experiment!
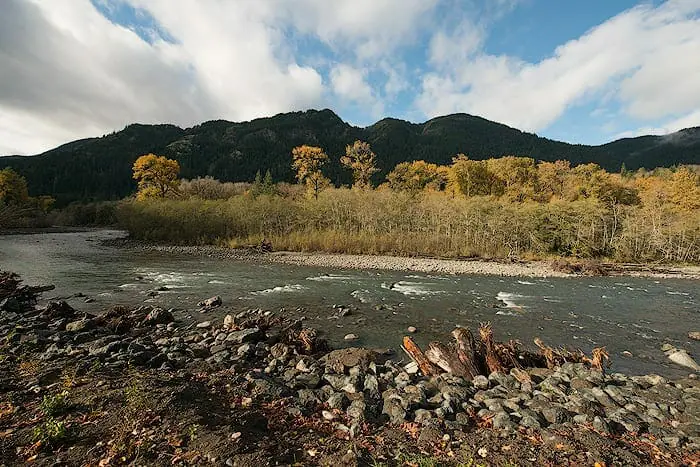
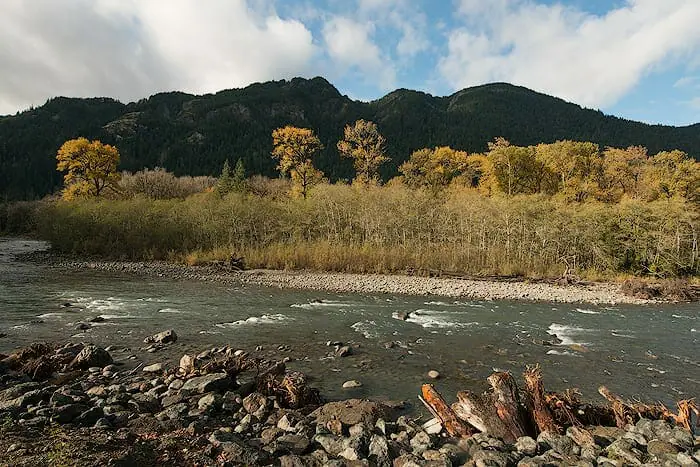
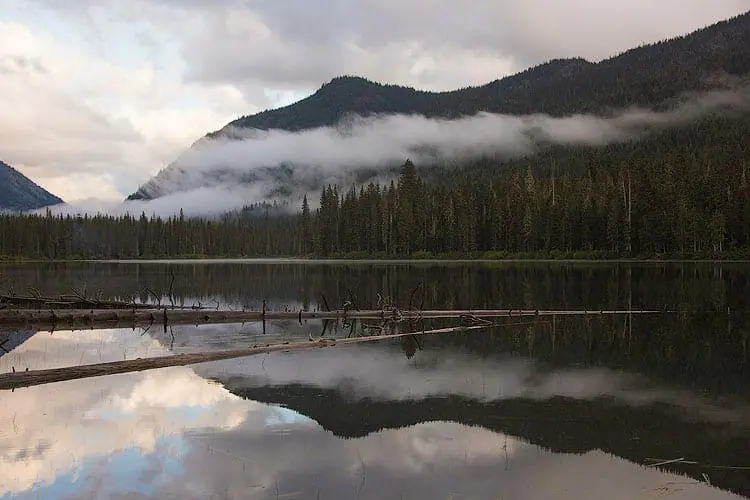
The first example below shows an image taken at f/9 & 145mm effective focal length. Even at f/9 the background is out of focus.
Due to the increased focal length the depth of field decreased. If this image was taken at 50mm instead of 145mm, f/9 would have provided sharp focus over the entire depth of field.
The Brothers Wilderness – Washington State
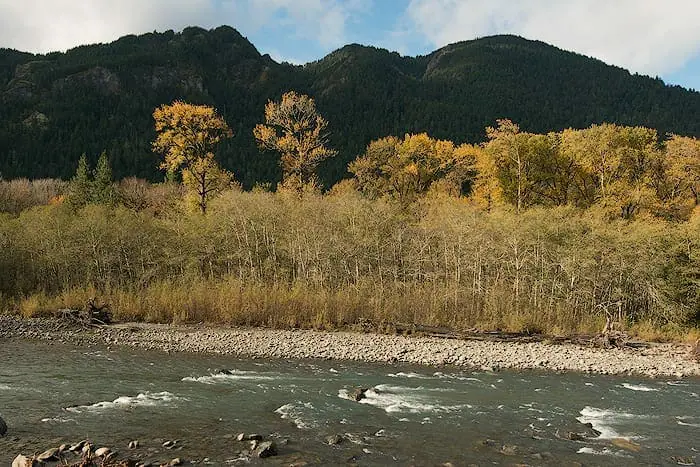
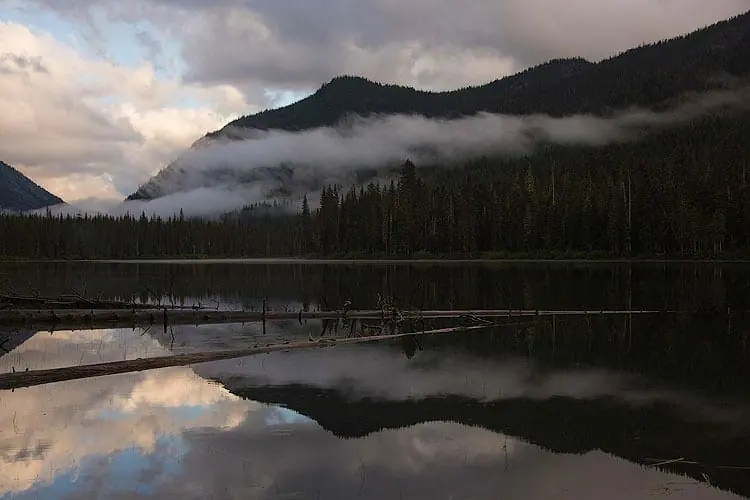
The next example shows an image taken at f/11 and 250mm effective focal length. At first glance, it may appear to be focused throughout the entire depth of field.
Looking at the bottom-righthand corner, the image sharpness starts to degrade significantly.
This is due to the decreased depth of field from increased focal length.
To compensate for this issue the f-stop value could be increased to f/16, slightly extending the depth of field.
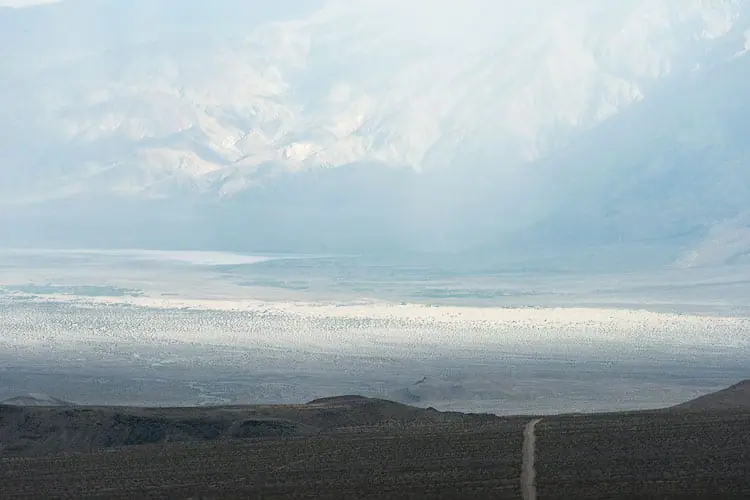
Death Valley Wilderness – California
Selecting the Correct F-Stop & Depth of Field
All of the information above provides the foundation for selecting the best camera settings using the Photography Exposure Triangle.
To correctly select the best f-stop and depth of field a firm understanding in shutter speed & ISO are required.
First learn the main 3 settings, f-stop, shutter speed, and ISO.
Then continue on to the Photography Exposure Triangle Guide, for complete details on combining all of the settings.


Comments
Post a Comment
If any doubts let me know..